If you happen to prefer different keys to the CodeRush defaults, or if you’ve downloaded a third party plugin which needs some keys configuring, then at some point you’re going to want to visit the shortcuts page of the options screen.
Once you launch the options screen (DevExpress\Options or CTRL+SHIFT+ALT+O), you can locate the shortcuts page in the tree on the left at IDE\Shortcuts.
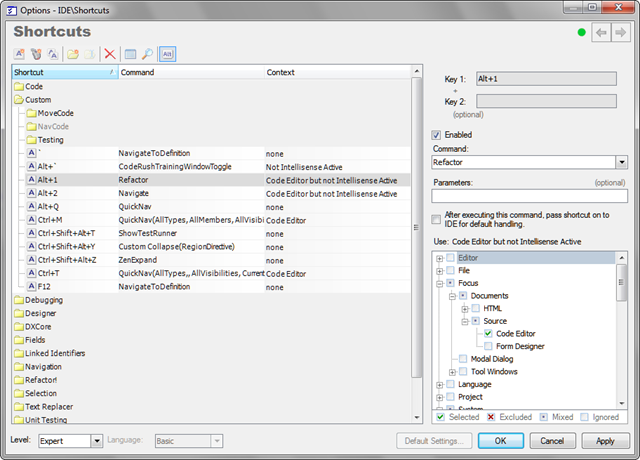
At this point you should see something like the following:
(Note:The page tree has been collapsed to allow extra space for the other features of this page.)

The tree on the left shows a hierarchical view of all of the shortcut keys recognised by CodeRush at the current time.
Above the tree are several icons allowing you to:
- Create new Keyboard shortcut
- Create new Mouse shortcut
- Duplicate Shortcut
- Create Folder
- Rename
- Delete
- Hide Shortcut Folders – This will flatten the hierarchy and sort the items by shortcut. This is useful for tracking down any conflicts or quickly determining if a given keystroke is actually in use and in what context.
- Search for Shortcut
- Distinguish Left and Right Alt keys – Useful with some keyboard layouts / languages where these keys provide differing functions. FWIW I use a Qwerty keyboard with British English and I have never had to alter this setting.
Here are some steps to guide you through the creation of CodeRush shortcuts.
Create a Custom Folder
Before creating any new shortcuts, create a new folder called “Custom”. Use this folder (or one beneath it) as the location in which any new shortcuts are created. This has the benefit of collecting all of your custom shortcuts in a single location which makes sharing or moving them to another machine much easier.
Note: The on-disk representation of your shortcut settings can be found at: ‘%AppData%\CodeRush for VS.Net\1.1\Settings.xml\IDE\Shortcuts’
Choose your Shortcut
 Most of the time you’ll want to invoke your functionality via a keyboard shortcut of some kind. However you’ll want to give some thought to which key combination to use.
To specify a key combo, simply place your caret in the ‘Key 1’ box, and press the keys in the combination you’re after. If your shortcut is intended to be the first part of a chord (ie 2 key combos one after the other), you should enter the 2nd part of this chord in the ‘Key 2’ box. If either if these combos require any special keys ({Tab}, {Backspace}, {Delete}, {Esc} etc), these can be entered by using the right-click context menu of these boxes.
As stated before, you can use the “Hide Shortcut Folders” to help determine if there might be a conflict with an existing piece of CodeRush feature. If this turns out to be the case, you might solve this by allocating differing contexts to each of the conflicting shortcuts. (See contexts – below)
Command
 Next up you’ll have to choose the command that you want your shortcut to execute. Command refers to either a CodeRush Action or a Visual Studio command. CodeRush Actions are listed within the dropdown element of the command box. In the case of an Action, there might be some parameters you wish to pass to the Action. These may be passed via the Parameters box and should be comma separated if present.
Note: It’s worth bearing in mind that CodeRush Shortcuts are processed before those of Visual Studio, and only passed on to studio, if not handled by CodeRush (unless otherwise expressly specified). If you find a case where you need to pass these on to Studio afterward, just check the tick box underneath the parameters box.
Context
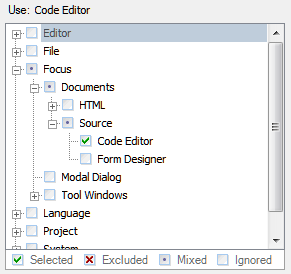
 Finally you should setup the context in which you wish your Shortcut to operate. Context is one of the key parts of the DXCore. It allows you to indicate that certain operations are only valid under particular circumstances. This means that you can allocate the same shortcut to 2 or more completely different operations by supplying them with different contexts (prerequisites). If these contexts are mutually exclusive, then there can be no confusion about which action you meant to invoke.
If you are assigning behaviour to a keystroke that is only appropriate when Studio is focused on the Code Editor, then you should indicate this in it’s context. Otherwise you might find that your functionality is also triggered from within a Find Dialog or similar. Most of the time this is not what you want.
So in order to create your shortcut, you need only specify the key combination, command name and context. You may also edit these portions of any existing shortcuts. Once you are happy with your shortcuts, simply click the ‘Apply’ or ‘Ok’ buttons, and you should find that your shortcut is immediately available.
Summary
CodeRush Shortcuts, like their Template counterparts, are very powerful due to the Context provided by the DXCore on which they are both built. This enables the same key combination to be interpreted differently depending on the current situation. This post has demonstrated how to create or edit a shortcut, the key parts of a each and what they mean.
You should now have everything you need to reassign any keys you like, as well as adding additional bindings for any third party plugins that you might download.
Free DevExpress Products - Get Your Copy Today
The following free DevExpress product offers remain available. Should you have any questions about the free offers below, please submit a ticket via the
DevExpress Support Center at your convenience. We'll be happy to follow-up.